

Last update:
OpenID Connect (OIDC)
Aug 21, 2026
OpenID connect 1.0 is a simple identity layer on top of the OAuth 2.0 protocol. It enables Client applications (also known as Relying Party in federation terminology) to obtain and subsequently securely verify the identity of the End-User. The end-user authentication is performed at an Authorization Server (a component of Identity Provider System). OpenID Connect 1.0 also allows the client application to further obtain basic identity profile information about the End User in an interoperable and REST-like manner.
Request flow
Below steps explain the detailed processing that happens at each process of an OpenID Connect compliant federated transaction.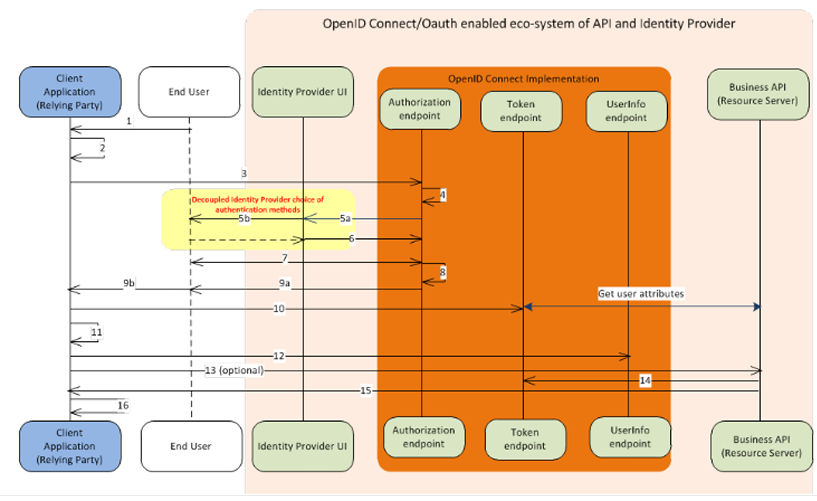
- End user (resource owner) accesses the client application through browser.
- Client application recognizes that an authenticated client application specific session does not exist and prepares an OpenID connect authentication request in the form of a HTTP GET request. This request will, at minimum, contain– client id, scope(s) – for identity at minimum (OpenID) and redirect URI where it expects authorization server to redirect back in the same browser.
- Client application issues the redirect request to OpenID Connect Authorization endpoint as prepared in previous step through user agent (browser).
- Authorization server validates that ClientID received in request is valid/identified (no client authentication at this step), validates the “redirect URI” provided with request is valid/pre-configured, and scope(s) requested by client are not disallowed for it by configuration.
- In steps 5a and 5b, the Authorization server redirects End User to the Identity Provider UI component to obtain the user’s authentication context.
- Identity Provider UI receives user authentication request from Authorization server.
- Two things can happen here between the end user and Authorization server:
- If the user-agent (browser) already has an authenticated session for end-user, user doesn’t get prompted for login.
- If the user-agent (browser) doesn’t have any authenticated session, then Identity Provider UI prompts user for login (enter username and password). Identity Provider UI because of its loosely couple architecture away from authorization server or client application can employ more sophisticated authentication mechanism like two-factor authentication or adaptive authentication.
Note: Even in case of explicit delegation, end-user will not be prompted if he/she has previously in the past has authorized the client application for same or a super-set type of permission unless that past-permission authorization has been explicitly revoked by either administrative or end-user intervention. - Authorization server captures user’s authorization based on previous step and obtained more information about user (if configured, “Get User Attributes connection in picture”) and generates a short-lived authorization code for client application.
- Authorization server redirects end-user through user-agent (browser) back to client application and this redirect request is sent to “Redirect URI” as specified by authentication request generated by client application in Step #2. This redirect URI contains authorization code along with it.
- Client application makes a backchannel (system to system) call to OpenID connect token server. Client application sends following parameters with this request – ClientID, client secret, authorization code – received as a result of Step #9.Authorization Server receives the client credentials (ClientID and client secret) and authorization code and validates those (authorization code has very short lifespan). After validation is successful, Authorization Server generates the ID Token (JWT containing user’s identity claims) and an Access Token. ID Token is signed by one of MAC based algorithm using Client Secret to prevent fraudulent use and maintain integrity of token. ID Token and Access token are returned to Client application in response.
- Client application verifies the ID Token (aka JWT) signatures using it’s own “client secret” and using JWS specifications.
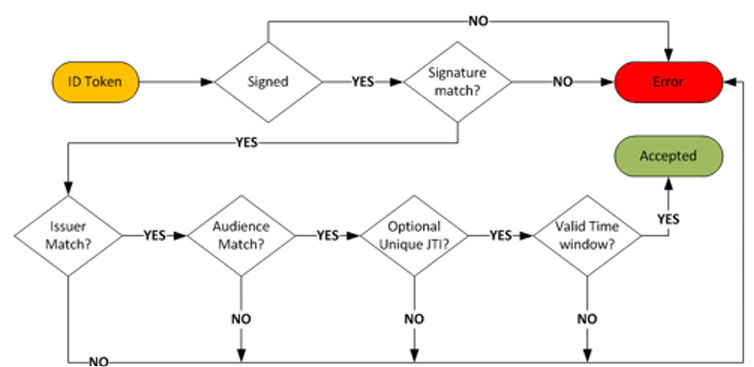
- If ID Token validation is successful, client application should create its own application specific session and set it in user’s browser to ensure that OpenID Connect request only happens once in a given user’s browser session.
- If ID Token validation fails, client application should log the error as a security incident and should fail ungracefully without displaying detailed cause about kind of error in user’s browser or in response to prevent against revealing too much information for a potential fraudulent usage.
- Client Application can identify End User by ID Token claims (“sub” claim contains HSID uuid). For other sensitive identity attributes, Client application can call OIDC UserInfo endpoint to get the End User’s identity attributes.Note: Due to the recent security guidance from NIST, HSID recommends only “sub” claim retrieval from ID token, and rest of sensitive attributes retrieval from OIDC UserInfo endpoint. This is not strictly enforced yet, however, new applications and FAL2 required application should use OIDC UserInfo endpoint and will not get sensitive attribute claims in ID token.Later steps will dive into how OpenID Connect process also enabled client application receiving an access token that can be used to invoke Business APIs within OpenID connect provider eco system to fulfill business specific functions which are dependent on business APIs (aka Resource server) – for example, claims, benefits, eligibility etc.
- Assuming Client Application needs to invoke a specific business API to retrieve (or update) more information about end-user to fulfill its business function, client application sends a request to business API. This request can be browser based or server-to-server (there are no restrictions). Client application includes the “access token” received earlier in Step #10 along with this request.
- Business API (aka Resource Server) invokes the OpenID Connect Token server to confirm the access token and obtain information about end-user identity as well as retrieve user’s authorizations (aka permissions or OAuth scopes) associated with the access token.Business API should fail ungracefully if any of the following conditions have occurred as a part of this validation:
- If access token isn’t valid/not found/expired
- If end-user authorization (aka permissions or OAuth scopes) doesn’t allow or is sufficient to perform the actual API operation invoked by Client Application.
Currently, Stargate Gateway contains this Step #14’s logic and wraps Business APIs, so that Business APIs can focus on the pure business logic. - Business API after successful validation of access token as well as validation of end user’s authorization provides response to Client application for its desired API invocation.
- Client Application now (assuming it doesn’t need to invoke more business APIs immediately) has access to user’s identity, has created its own application session (end result of Step #10/#11) and also has access to resource server (aka API) provided data and continues to engage with user through browser to provide business/UX experience/functions.
Environment domains for integration
HSID offers 1 non prod and 1 prod env for portal integration.
| Non-prod | https://nonprod.identity.healthsafe-id.com/ |
| Production | https://identity.healthsafe-id.com/ |
The following section shows various non-prod integration examples with non-prod URL / domain above. For prod integration, replacing the non-prod URL / domain to the prod URL / domain is required, and in addition to that, replacing environment specific OIDC configuration values, e.g. OIDC client ID / secret, etc.
Previous:
HSID EDA portal implementation guide
Share additional feedback to help us improve.
0/255
|
Powered by Aikyam @2025 All rights reserved

+1 866 451 2735
 +1 866 451 2735

+1 855 819 5909