

Last update:
Manage identity policies, branding and user self-service capabilities
Aug 21, 2026
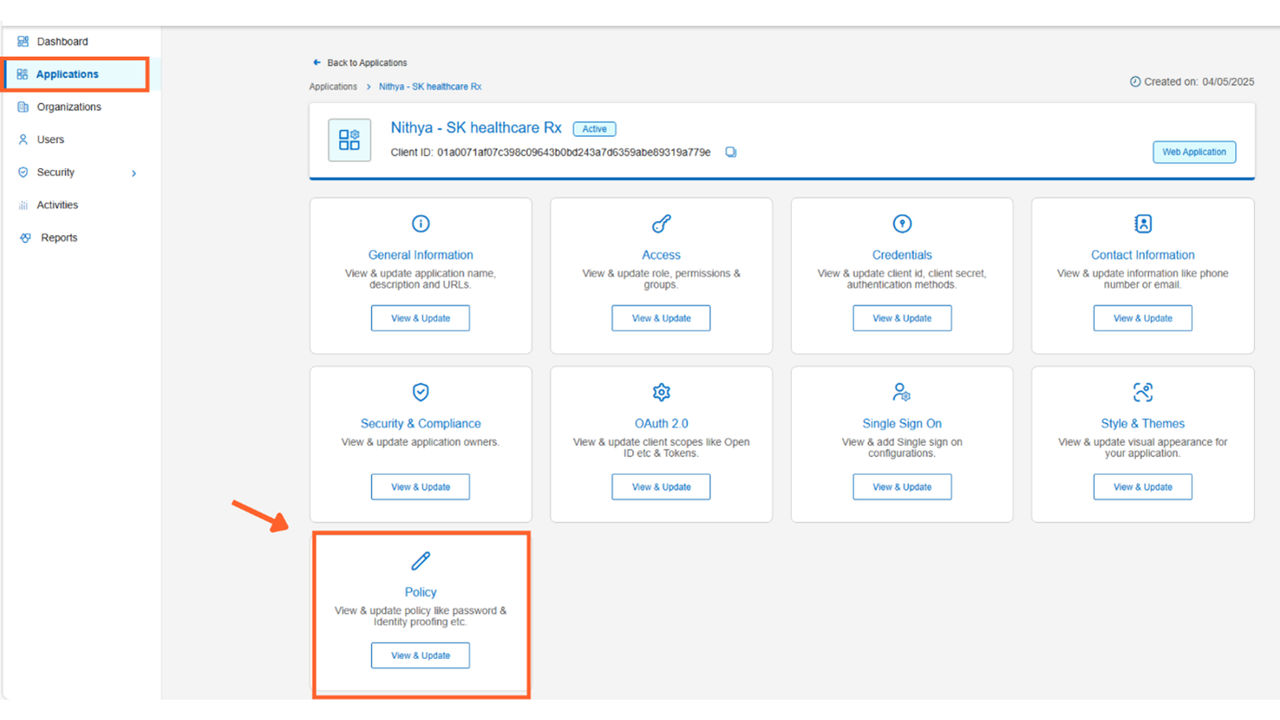
The Policy tile lets administrators manage essential security settings for applications across B2C tenants, such as identity proofing, password standards, authentication, and user registration.
The Branding & customization tile allows customization of themes, banners, and alert messages to match enterprise branding and engagement strategies.
Manage Identity Proofing
The Identity Proofing section enables you to configure how the system verifies and matches user records during both account creation and sign-in. The system verifies users based on the predefined user attributes such as First Name, Last Name, Date of Birth and a known identifier (such as Member ID or SSN) ensuring accurate and secure user identification. Currently, we are supporting the Smart Match feature as an identity matching method
Steps
To verify the users:
- In the left navigation pane, select Applications. Alternatively, you can select View Applications tile on the Dashboard.
- Select the application you want to configure.
- Go to the Policy tile and click View & Update.Define Identity Matching:
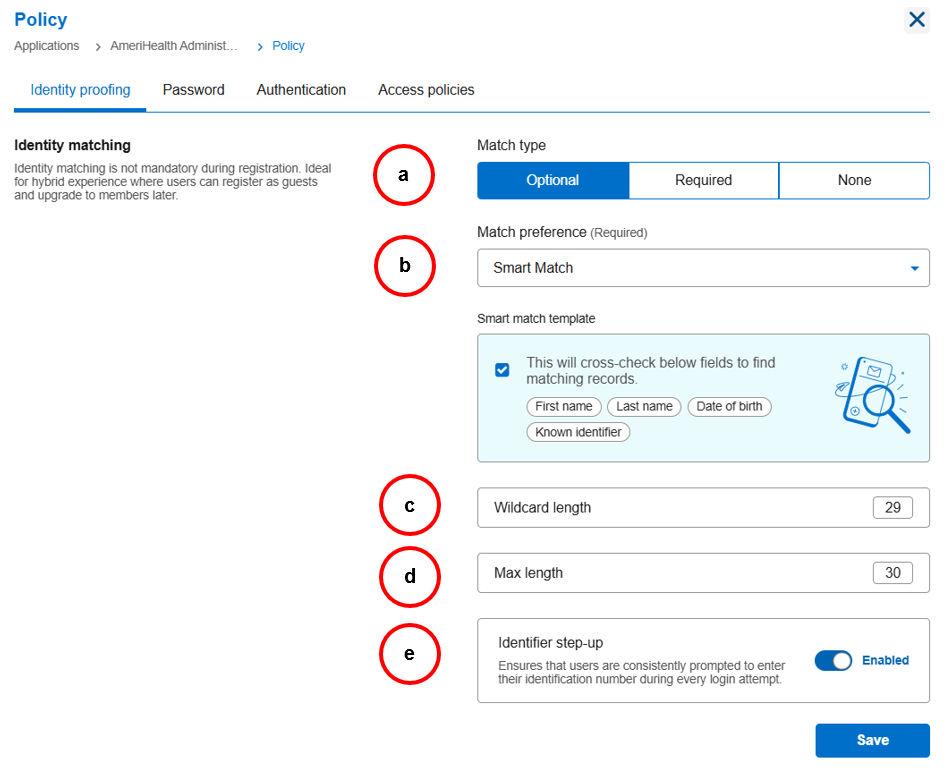
- Under the Identity proofing tab, perform the following steps:
- Match Type. Select one of the following options based on the application’s registration experience:
- Optional – Select this option when identity matching is not mandatory during initial registration. This is applicable when user registers as Guest and may later choose to upgrade (step-up) to a member account, where it identifies the golden record and checks eligibility during this transition. Use this setting for applications that support a hybrid experience, where user can register as a Guest and later step-up to member.Note: This option is selected by default for HSID applications.
- Required – Select this option to enforce identity matching as a mandatory step, requiring a successful golden record match to proceed with user registration. .Note: Use this setting for applications that support a Member-only (matched) experience.
- None – Select this option if the application does not require identity matching. Use this setting for applications that support a non-member (unmatched) experience, where users can register and gain access without meeting any eligibility criteria.Note: This option is selected by default for OHID applications.
- Optional – Select this option when identity matching is not mandatory during initial registration. This is applicable when user registers as Guest and may later choose to upgrade (step-up) to a member account, where it identifies the golden record and checks eligibility during this transition. Use this setting for applications that support a hybrid experience, where user can register as a Guest and later step-up to member.
- Match preference: The Smart Match option is selected by default. It checks key user attributes–such as First Name, Last Name, Date of Birth, and known identifier–to find matching golden records in the EiMP. The system performs a smart match, supporting more than 20 identifiers.
- Wildcard length: By default, the smart match supports the first 9 digits for the EiMP check.Note: Wildcard search is a configurable smart search logic that enables partial or complete identifier matching, handling leading zeros, non-alphanumeric characters, spaces, and various other formats.
- Max length:Enter the value to limit the maximum number of characters to be considered for a match. The default value is set to 30.
- Identifier Step-up: Enable this option to prompt users to enter their identification number during every login attempt, ensuring consistent identity verification and supporting secure access to the application.
- Match Type. Select one of the following options based on the application’s registration experience:
- Click Save.
Set password policies
The Password tab in the Aikyam Identity Console enables you to assign password policies that meet your organization's specific needs. The default password policy set in the identity console follows industry best practices.
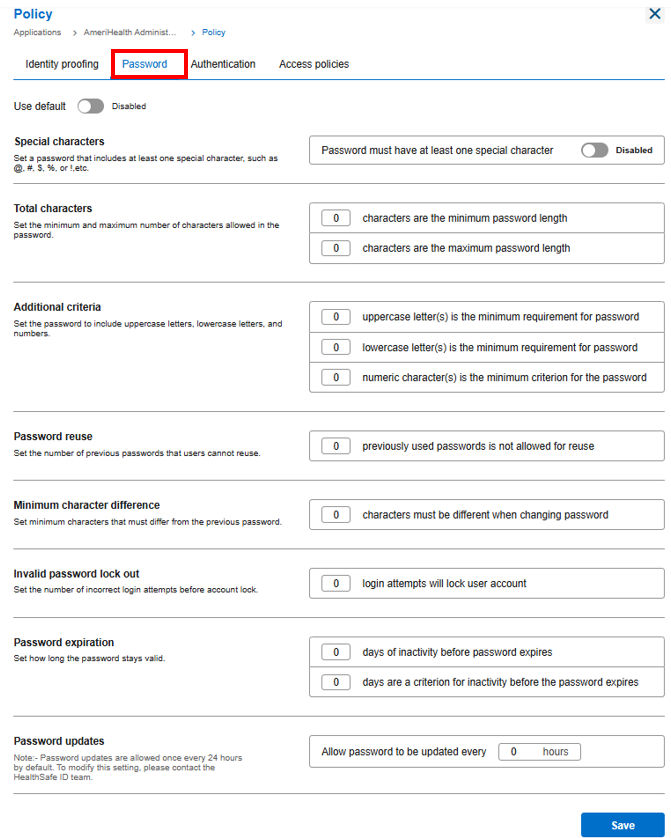
| Setting | Description |
| Special characters | Require at least one special character in passwords (Example, @, #, $) |
| Total characters | Define the minimum number of characters required for a password. Define the maximum allowed length for passwords. |
| Additional criteria | Enforce additional password complexity: at least one uppercase letter, one lowercase letter, and one numeric character. |
| Password reuse | Set the number of previous passwords that cannot be reused. |
| Minimum character difference | Specify the number of characters that must differ when changing a password. |
| Invalid password lockout | Define the number of consecutive failed login attempts that will lock the user account. |
| Password expiration | Set the number of days after which a password must be changed. Set the number of days after which inactive users must reset passwords. |
| Password updates | Specify the minimum interval that must pass before a user can change their password again, as defined by organizational policy. |
| Policy enforcement | Enable the toggle button if you want to enforce the policy when the user changes the password. |
Manage authentication & registration policies
The Access policies tab enables you to define authentication behaviors and registration policy settings for your application.
Note: Tenant-level authentication and registration policies are set by default. You can toggle this default policy off and configure it according to your requirements
Steps
- In the left navigation pane, select Applications. Alternatively, you can select View Applications tile on the Dashboard.
- Select the application you want to configure.
- Navigate to the Policy tile and click View & Update.
- Under Access policies tab, you can, configure authentication policies, configure registration policies, and configure COPPA compliance settings.
- To configure authentication policies:
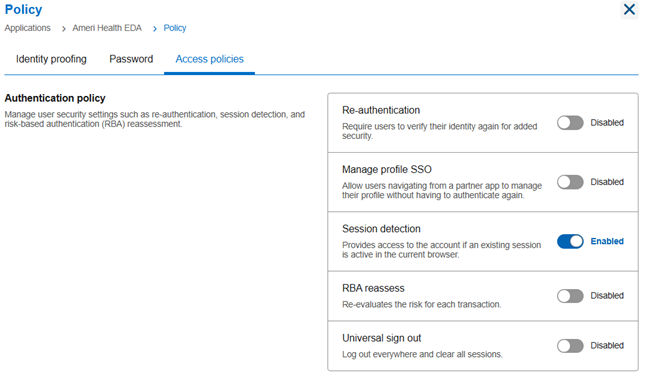
- Re-authentication: Select this option if users need to verify their identity again before accessing sensitive features or data.
- Manage profile SSO: Select this option to enable users to manage their profiles without the need of reauthenticating.
- Session detection: Enable this setting to detect and manage active sessions in the user’s browser. This helps prevent duplicate logins and unauthorized session access.
- RBA reassess: Select this option if you want to reassess the user’s risk level during an authentication attempt. This requires Risk-Based Authentication to be enabled.
- Universal sign out: Select this option if you want to log out of multiple applications and services with the single sign-on.
- To configure registration policies:
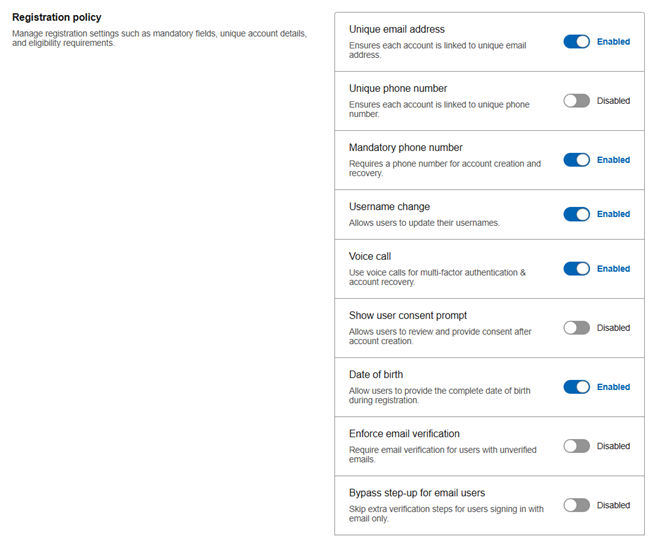
- Unique email address: Select this option to prevent multiple accounts from using the same email address.
 Note: For OHID applications, it is recommended to enable the unique email address.
- Unique phone number: Select this option if each user must have a distinct phone number.
- Mandatory phone number: Requires user to provide a phone number during registration.
- Username change: Allows user to update their username after registration.
- Voice call: Enables phone call verification during the authentication process.
- Show user consent prompt: Displays a consent prompt during registration or login to collect user consent.
- Date of birth: Requires user to provide a date of birth during the registration process.Note: For OHID applications, it is recommended to enable the Date of birth.
- Enforce email verification: Requires the user to verify the email provided during registration.Note: For OHID applications, this field is not applicable.
- Bypass step-up for email users: Disables the additional verification steps for users signing with email only.
- COPPA compliance settings: Protects the privacy of children under 13 by requiring parental consent and limiting data collection.
- COPPA restriction: Never disable the COPPA (Children's Online Privacy Protection Act) Compliance. This field enforces restrictions to prevent users under age 13 from registration, as required by COPPA regulations.Note: This is a federal legal requirement that prohibits access to your platform by users under the age of 13. Non-compliance can result in substantial financial penalties for each violation.
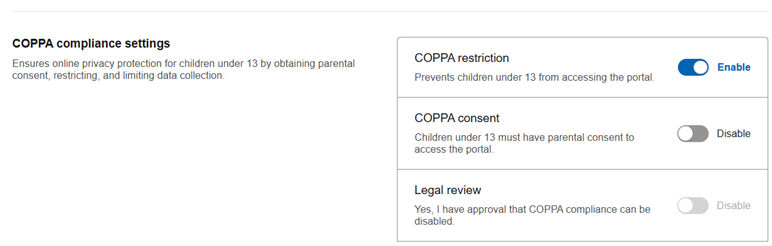
- COPPA consent: Requires verified parental consent for users under 13 to access the portal.
- Legal review: If an application chooses not to enforce COPPA, it must first consult with legal counsel. A formal written statement from legal counsel, explicitly authorizing the bypass of COPPA, must be submitted to us. This is the only acceptable condition under which COPPA enforcement may be bypassed.
- COPPA restriction: Never disable the COPPA (Children's Online Privacy Protection Act) Compliance. This field enforces restrictions to prevent users under age 13 from registration, as required by COPPA regulations.
- To configure authentication policies:
- Click Save.
Set up branding for the sign-in page for HSID applications
Steps
To configure branding for HSID application:
- In the left navigation pane, select Applications. Alternatively, you can select View Applications tile on the Dashboard.
- Select the application you want to configure.
- Navigate to the Branding & customization tile and click View & Update.
- Go to the Branding section and configure the following fields:
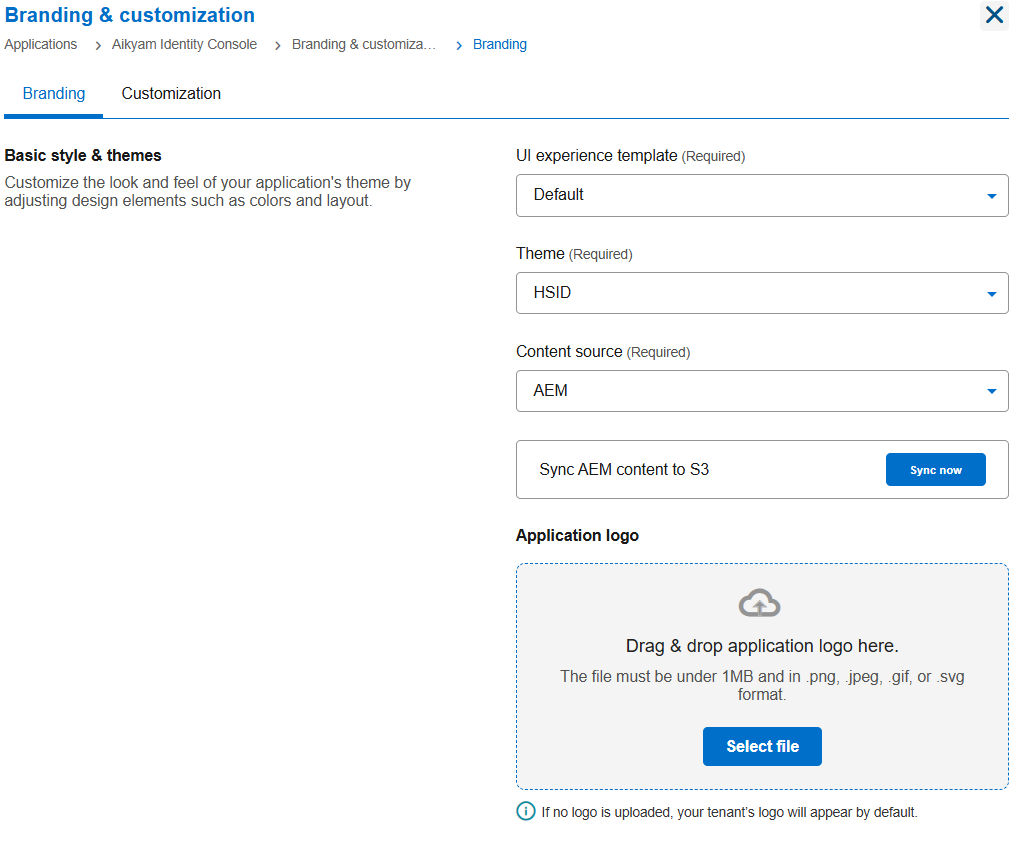
- UI Experience Template: Select the UI template from the dropdown menu to configure the appearance of the sign-in screen.
- Theme: HSID
- Content source: By default, all custom content is sourced from AEM.
- Sync AEM content to S3: If you want to sync the content after your changes, click Sync now.
- Application logo: Click Select file or drag a logo into the upload area. Use the file formats: .png, .jpeg, .gif, .svg and keep the file size under 1 MB.Note: If you do not provide a logo, the application will display the tenant’s logo by default
- To configure banner message on the sign-in screen, enter a message in the provided text editor.Note: If you do not provide a logo, the application will display the tenant’s logo by default.
- To configure alert message (Pop-up notification),
- Alert header: Add a short, descriptive title such as “Important Update” or “Action Required.
- Alert message: Use the rich text editor to write the full message.Note: Use alert messages to notify users of critical issues or policy reminders. The platform displays these messages as a pop-up after the user lands on the sign-in page
- Click Save to apply changes.
Set up branding for the sign-in page for OHID applications
Steps
- In the left navigation pane, select Applications. Alternatively, you can select View Applications tile on the Dashboard.
- Select the application you want to configure.
- Navigate to the Branding & customization tile and click View & Update.
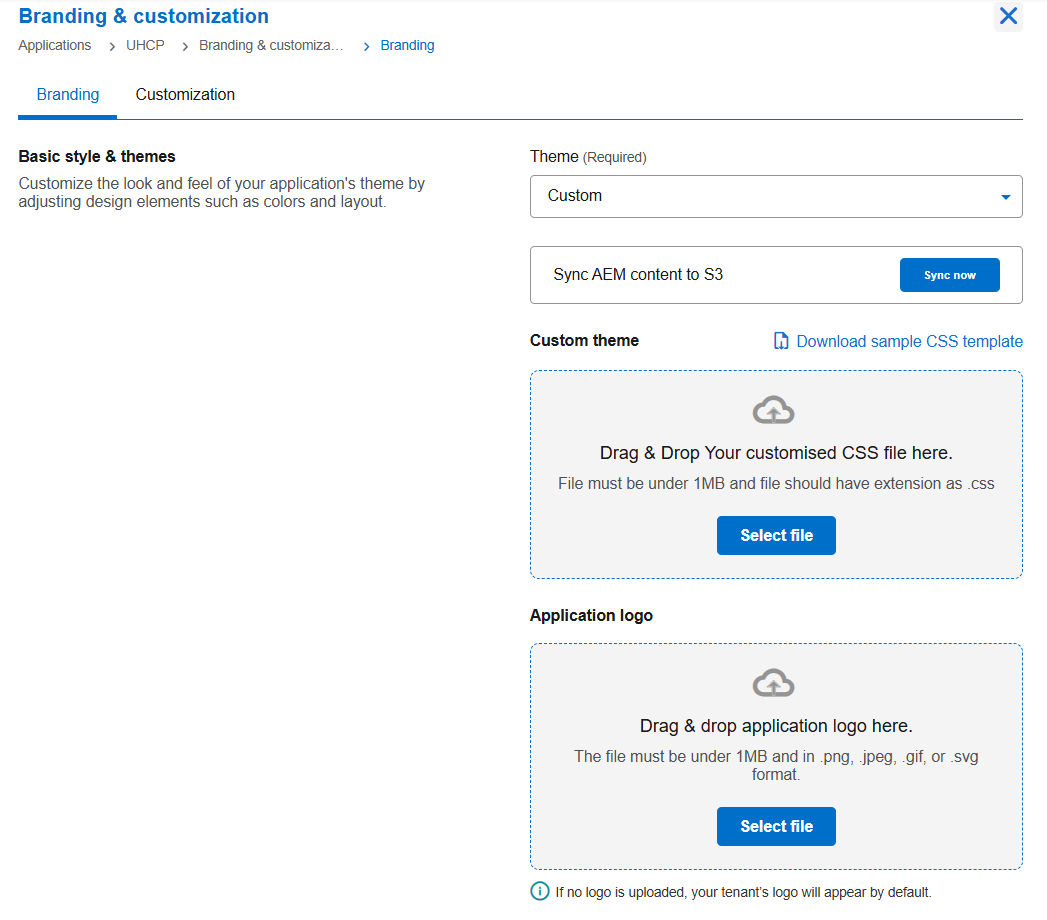
- Select Theme > Custom to upload a stylesheet for your application.To upload a custom theme:
- Click Download sample CSS template to review the structure.
- Click Select file or drag your .css file into the custom theme box.Note: Ensure the file is under 1 MB and uses the .css extension.
- Application logo: Click Select file or drag a logo into the upload area. Use the file formats: .png, .jpeg, .gif, .svg and keep the file size under 1 MB.Note: If you do not provide a logo, the application will display the tenant’s logo by default
- To configure banner message on the sign-in screen, enter a message in the provided text editor.Note: Use the banner message to display a persistent message, such as scheduled maintenance or a welcome message, at the top of the application’s sign-in screen.
- To configure alert message (Pop-up notification),
- Alert header: Add a short, descriptive title such as “Important Update” or “Action Required”.
- Alert message: Use the rich text editor to write the full message.Note: Use alert messages to notify users of critical issues or policy reminders. The platform displays these messages as a pop-up after the user lands on the sign-in page.
- Click Save to apply changes.
Manage user self-service settings
Use these settings to control whether users can manage their own accounts. You can enable or disable options for account creation, account updates, recovery, and activation.
Steps
- In the left navigation pane, select Applications. Alternatively, you can select View Applications tile on the Dashboard.
- Select the application you want to configure.
- Navigate to the Branding & customization tile and click View & Update.
- Click Customization tab.
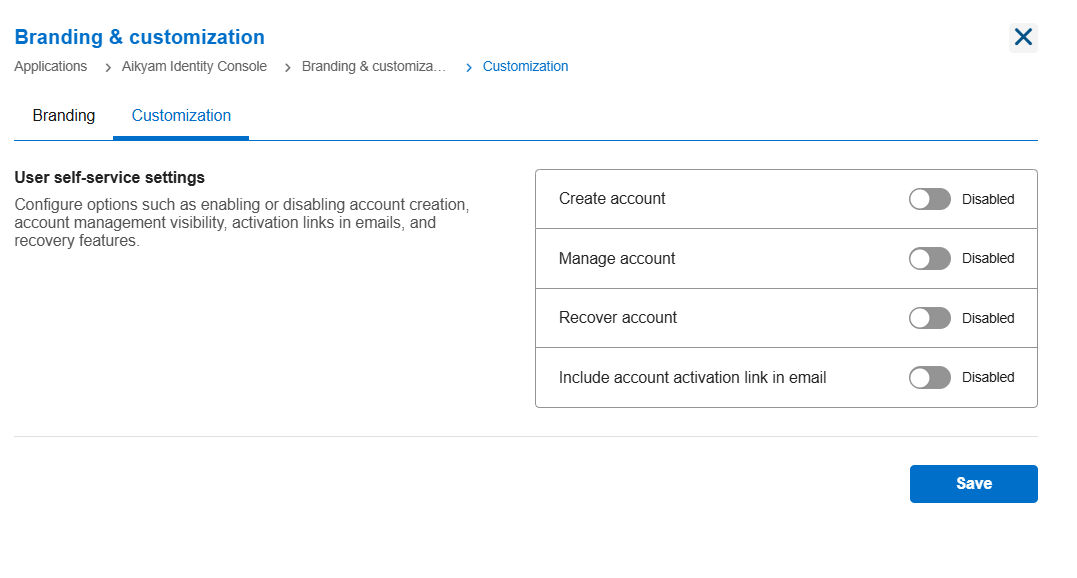
- Create account: To allow users to create their own accounts, toggle on the Account creation setting.
- Manage account: To let users update personal details such as name or email address, toggle on the Account management setting.
- Recover account: To enable password resets and account recovery, toggle on the Account recovery setting.Note: The Recover account setting is not available for the OHID applications.
- Include account activation link in email: To send an activation link in the welcome email, toggle on the Email activation link setting.
- Click Save to save changes.
Previous:
Configure authentication settings
Next:
Manage identity proofing
Share additional feedback to help us improve.
0/255
|
Powered by Aikyam @2025 All rights reserved

+1 866 451 2735
 +1 866 451 2735

+1 855 819 5909