

Last update:
Register an application
Aug 21, 2026
Learn how to register an application in the Aikyam identity console.
An application that communicates with the Aikyam Identity Provider is defined as a client. This could be a web browser-based app, or a server app. Administrators will register the application (i.e. client) in the identity console to enable CIAM (Customer Identity and Access Management) solution. This allows you to manage users, govern their access, and protect resources within the applications, all through a unified interface. Upon request, the super admin or app admin will register the application and configure its settings based on specified requirements. The application types supported by the Aikyam identity platform are:
- Web applications – a customizable web application that uses redirects for authentication
- Machine-to-Machine applications – a backend service application that uses secure credentials for automated authentication between systems.
- Mobile applications – Native – a mobile, desktop, service, or a smart device application that uses redirects for authentication.
Register a web application
You can register web applications in the Aikyam Identity console if you're assigned the Identity Console administrator role.
Prerequisites
Ensure that you are logged in with a super admin or app admin role, as only they have the privileges to register applications.
Tip: Keep the IR form and the AIC open in separate tabs. This makes it easier to switch between them and speeds up the application setup process.
To register a web application that uses redirects for authentication,
- Sign-in to the Aikyam Identity Console using either your MSID or tenant ID, depending on your role.
- In the left navigation pane, select Applications.
- Click Register Application.
- Application Name: Enter the name of the application (mandatory field).
- Choose an application type: Select Web Application to register a customizable web application that uses redirects for authentication.
- Application ID: By default, this field is pre-filled with a system-generated ID. To customize it, click Customize ID, then enter a unique app ID.
Note: Recommended: Refer to the IR Form for the application name and AID ID. Use an abbreviated name with the last 5 digits of the AID ID, followed by "N" to indicate a new implementation. For instance, Finance Tracker app with AIDE ID ending in 54321 becomes FT54321N.Instead, to generate an ID automatically, click Auto-Generate.d. Subject typeSelect one of the following subject types:- Public – Uses the same user ID across all applications within the organization.
- Pairwise – Generates a unique user ID for each application.
- Sector identifier: Enter the valid URL (trusted redirect URI) that defines a group of related applications.
Important: If the entered URL is invalid, authentication may fail.Note: We recommend pairwise for applications requiring user privacy and data isolation across multiple relying parties. For example, the Optum Provider portal could use pairwise to keep patient data private between healthcare providers.e. Login callback URL – Define the endpoint where users are redirected after successful login. - Click Register.
The application is successfully onboarded.
Now, select Proceed to navigate to the application configuration page or select Close to return to the Applications landing page.
Register a machine-to-machine backend application
Learn how to enable secure and efficient connections between your backend services through robust authentication protocols.Prerequisites: Ensure that you are logged in with a super admin or app admin role, as only they have the privileges to register applications.
Steps:
To register an M2M application,
- Sign-in to the Aikyam Identity Console using either your MSID or tenant ID, depending on your role.
- In the left navigation pane, select Applications.
- Click Register Application.
- Application Name: Enter the name of the application (mandatory field).
- Choose an application type: Select Machine to Machine Application to register for a backend service application that uses secure credentials for automated authentication between systems.
- Application ID: By default, this field is pre-filled with a system-generated ID. To customize it, click Customize ID, then enter a unique app identifier.
Note:If the ID is already in use, an error message will appear: “This ID is already in use by another application. Please change the App ID to continue”
To generate an ID automatically, click Auto-Generate.
Note: For Machine-to-Machine apps, the subject type is not displayed, as the default is set to “Public”.
Callback URL: Define the endpoint where users are redirected after successful login.
5. Click Register. The application is successfully onboarded.
Note: If the ID is already in use, an error message will appear: “This ID is already in use by another application. Please change the App ID to continue”
To generate an ID automatically, click Auto-Generate.
Note: For Machine-to-Machine apps, the subject type is not displayed, as the default is set to “Public”.
Now, select Proceed to navigate to the application configuration page or select close to return to the Applications landing page.
Register native application
Ensure that you are logged in with an organization admin or app admin role, as only they have the privileges to register applications.
Steps
To register a native application:
- Sign in to the Aikyam Identity Console.
- In the left navigation pane, select Applications.
- Click Register Application. An overlay panel opens with the following fields:
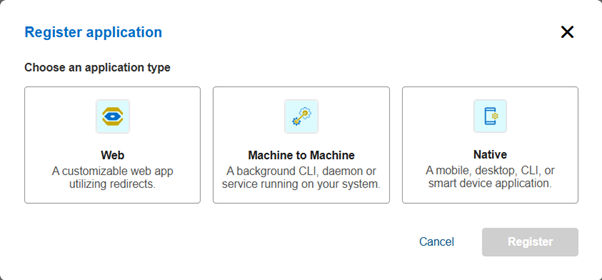
- Choose an application type: Select Native to register the device.
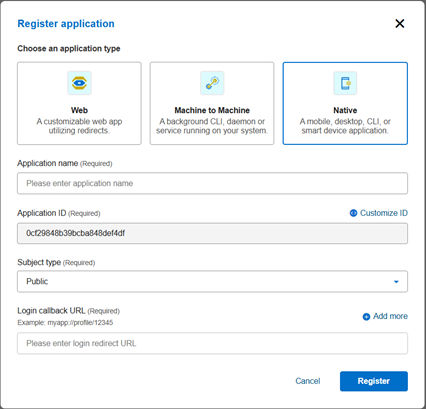
- Application name: Enter the name of the application (mandatory field).
- Application ID: By default, this field is pre-filled with a system-generated ID. To customize it, click Customize ID, then enter a unique app identifier.
- Recommended: Refer to the IR Form for the application name and AID ID. Use an abbreviated name with the last 5 digits of the AID ID, followed by "N" to indicate a new implementation. For instance, Finance Tracker app with AIDE ID ending in 54321 becomes FT54321N.Note: If the ID is already in use, an error message will appear: "This ID is already in use by another application. Please change the App ID to continue". Instead, to generate an ID automatically, click Auto-Generate.
- Subject type . Select one of the following subject types:
- Public – Uses the same user ID across all applications within the organization.
- Pairwise – Generates a unique user ID for each application.
- If you select Pairwise from the dropdown, you must enter the Sector identifier URL.
- Sector identifier URL: Enter the valid URL (trusted redirect URI) that defines a group of related applications.
Important: If the entered URL is invalid, authentication may fail
Note: We recommend pairwise for applications requiring user privacy and data isolation across multiple-relying parties. For example, the Optum Provider portal could use pairwise to keep patient data private between healthcare providers. - Login Callback URL – Define the endpoint where users are redirected after successful login.
- Choose an application type: Select Native to register the device.
- Click Register.
The application is successfully onboarded. Now, select Proceed to navigate to the application configuration page or select Close to return to the Applications landing page.
Previous:
Standard workflow
Next:
Search applications
Share additional feedback to help us improve.
0/255
|
Powered by Aikyam @2025 All rights reserved

+1 866 451 2735
 +1 866 451 2735

+1 855 819 5909